react-lightning-design-systemをVisualforceで使う
件名の通りですが少しハマりどころがあったのでメモ。
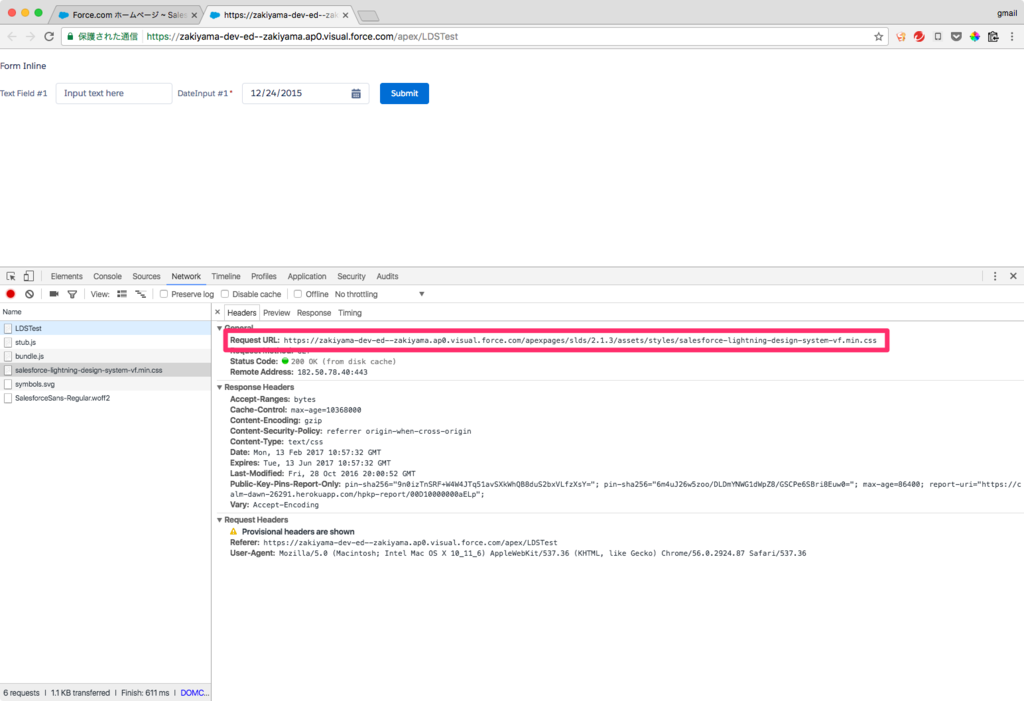
普通に react-lightning-design-system を使おうとすると SVG アイコン使用時に Unsafe attempt to load URL エラーが表示されます。
Unsafe attempt to load URL https://zakiyama-dev-ed.my.salesforce.com/assets/icons/utility-sprite/svg/symbols.svg#event from frame with URL https://zakiyama-dev-ed--c.ap2.visual.force.com/apex/LDSTest. Domains, protocols and ports must match.
いわゆる CORS: Cross Origin Resource Sharing、つまり salesforce.com と visual.force.com という異なるオリジンでリソースのやり取りをしようとしているのが原因です。
Issue にもあります。
これを回避するためにはコメントにもあるように、util.setAssetRoot(path) というメソッドを使います。
また setAssetRoot に渡す静的リソースへのパスは、Visualforce 側で
{!URLFOR($Resource.slds)}
を使い取得します。
Visualforce ページと、React 側のエントリーポイントとなる index.js は以下のようになります。
<apex:page showHeader="false" standardStyleSheets="false" docType="html-5.0">
<html>
  <head>
    <meta charset="utf-8" />
    <apex:stylesheet value="{!URLFOR($Resource.slds,'assets/styles/salesforce-lightning-design-system.min.css')}" />
  </head>
  <body>
    <div id="root"></div>

    <apex:includeScript value="{!URLFOR($Resource.app, 'bundle.js')}" />
    <script type="text/javascript">
      App.init(document.getElementById('root'), '{!URLFOR($Resource.slds)}/assets');
    </script>
  </body>
</html>
</apex:page>
// src/scripts/index.js
import React from 'react';
import { render } from 'react-dom';
import { util } from 'react-lightning-design-system';

import App from './components/App';
import '../stylesheets/index.scss';

export const init = function(el, assetRoot) {
  util.setAssetRoot(assetRoot);
  console.log('Set asset root as ', util.getAssetRoot());
  render(<App />, el);
};
この例では、webpack.config.js の設定でビルドした JavaScript を App というライブラリ名でエクスポートしてます(参考)
また、初期化用関数の引数として渡してますが
window.assetRoot = '{!URLFOR($Resource.slds)}/assets';
のように window 関数に直接変数を生やして index.js 側で参照するという方法もあります。
余談:<script> タグと <apex:includeScript> タグの読み込み順序に関して
上の例では、<apex:includeScript> による JS 読み込みが続く <script> タグ内のスクリプトより先に実行される必要がありますが
https://developer.salesforce.com/docs/atlas.ja-jp.204.0.pages.meta/pages/pages_compref_includeScript.htm
を見ると、loadOnReady を明示的に true にしない限り <apex:includeScript> の方がすぐに読み込まれるようです。
(すぐに、というのが曖昧ですが、一旦こちらの読み込みが先行すると考えておいて良さそうです)
Spring'17 で追加された <apex:slds> を使う場合
Spring'17 から Visualforce ページでも、静的リソースにアップロードすることなくプラットフォームから提供される SLDS が使えるようになります。
参考:Visualforce ページでの Lightning Design System の使用
これを使う場合、先ほどのコードは
 <html>
   <head>
     <meta charset="utf-8" />
-    <apex:stylesheet value="{!URLFOR($Resource.slds,'assets/styles/salesforce-lightning-design-system.min.css')}" />
+    <apex:slds />
   </head>
   <body>
     <div id="root"></div>

     <apex:includeScript value="{!URLFOR($Resource.app, 'bundle.js')}" />
     <script type="text/javascript">
-      App.init(root, '{!URLFOR($Resource.slds)}/assets');
+      App.init(root, '{!URLFOR($Asset.SLDS)}/assets');
     </script>
   </body>
 </html>
というように、静的リソースから SLDS を読み込んでいた部分を <apex:slds /> に置き換え、さらにパス部分は $Asset.SLDS という変数を使って取得するようにします。
(2017/02/20追記)
バージョンは最新バージョンの 2.2.1 でなく 2.1.3 のよう。
あと読み込んでいるリソースが salesforce-lightning-design-system-vf.min.css なのも気になる。
(追記ここまで)
さらに、applyBodyTag または applyHtmlTag が false だった場合
リリースノートおよび開発者ガイドの該当ページによると、
Using the Lightning Design System | Visualforce Developer Guide | Salesforce Developers
if you set applyBodyTag or applyHtmlTag to false, you must include the scoping class slds-scope
とあるので、
-  <body>
+  <body class="slds-scope">
などとする必要があります。
(そういう意味で、上の例では applyBodyTag および applyHtmlTag を false にしていないのに <html> や <body> を使っているのは適切ではないですね)
おまけ:<apex:slds> の既知のバグ
検証中、<apex:slds> を使うと最初の Unsafe attempt to load URL エラーが発生することがわかりました。
どうやら $Asset.SLDS の URL が salesforce.com になっており、調べてみると StackExchange にありました。バグのようです。
近日中に修正されるようなので1週間後ぐらいに確認してみることとします。
(2017/02/20追記)
今日見たら直ってました。
StackExchange のコメントに更新はなく、Known Issues にもないので、動きを確認した限りですが。
(追記ここまで)
リポジトリ
webpack2でTree Shaking以外に何ができるようになったのかメモ
メモ。
webpack 2 正式リリース(バージョンは 2.2)だとか Tree Shaking という機能がいいらしい とかは目にしていたけど
結局 v1 -> v2 とメジャーバージョンが上がって Tree Shaking 以外に何が変わったの?というのがよくわからなかったので調べてみた。
なお、Tree Shaking については最後に記載している。
参考にしたサイト
「webpack 2 whats new」とかでググって、見つけられたのはここ。
What's new in webpack 2 · GitHub
(WIP て書いていて最新の情報かどうかわからないけど)ここに書いてある内容で気になったものをピックアップする。
なお、Getting Started with webpack 2 という記事は残念ながら v1 → v2 における新機能などについては言及されていなかった。
v2 からできるようになったこと
ES6 Modules をサポート
Babel を使ってトランスパイルしなくても import, export をそのまま解釈できるようになった。
ただし、Babel なしだと import/export 以外の ES2015 をトランスパイルしてくれるわけではない ので注意。
(こちらで確認した限り、たとえば const は const のまま、という意味)
また、Babel なしだと webpack.config.babel.js というファイル名で ES2015 形式で書けるようにはならないので注意。
System.Import による動的インポート
(2017/02/08追記)
Twitter で
System.importはdeprecatedになってimport()が使えるようになったというのが正解? https://t.co/MJ6JVMWWb5 "webpack2でTree Shaking以外に何ができるようにな…" https://t.co/Tf4k3VRbRL
— azu (@azu_re) 2017年2月8日
というのを教えていただいた。
確認したところ
Release v2.1.0-beta.28 · webpack/webpack
でたしかに
add
import()as Code Splitting construct. It should be used instead ofSystem.importwhen possible.System.importwill be deprecated in webpack 2 release (removed in webpack 3) as it's behavior is incorrect according to the spec.
という記載があったので、System.import() のかわりに単に import() を使った方がいい。
試していないが、以下 System.import() 部分を import() に置き換えても動くはず。
(追記ここまで)
コード中に System.import('モジュールへのパス') と書くことで動的にモジュールをインポートできる。
reuqire と役目は同じ。
function onClick() {
    System.import("./module").then(module => {
        module.default;
    }).catch(err => {
        console.log("Chunk loading failed");
    });
}
特徴としては System.Import の結果が Promise として返される ところ。
これによりモジュール読み込みに失敗したときにこちら側でハンドリングすることができる。
System.Import で読み込もうとしているモジュールはチャンクファイルとして本体のファイルとは別のファイルが生成されるよう。
たとえば上のコードを index.js として、ディレクトリ構成が
├── src
│   ├── index.js
│   └── module.js
└── webpack.config.js
webpack.config.js が
module.exports = {
  entry: './src/index.js',
  output: {
    filename: 'bundle.js',
    path: path.resolve(__dirname, 'build')
  },
  ...
となっていた場合、ビルド後は
├── build
│   ├── 0.bundle.js
│   └── bundle.js
となった。
また、
System.import("./routes/" + path + "/route")
のように変数で指定することも可能。
この場合は(require のときも同じだと思うが)webpack は可能性のあるファイルを自動的に判別してくれる。
このときも可能性のあるモジュールファイルごとにチャンクファイルが生成される。
webpack.config.js で関数を export することが可能に
v1 のときは、webpack.config.js は
module.exports = {
  entry: './src/index.js',
  ...
}
というようにオブジェクトを export していたが、関数を export することもできるようになった。
module.exports = function(options) {
  return {
    entry: './src/index.js',
    ...
  };
}
これで何が嬉しいのかと言うと、コマンドライン実行時に --env を指定することでこの関数に任意の設定情報を渡せるようになった。
--env foo
のように文字列を渡すか、
--env.foo 1 --env.bar 2
のようにするとオブジェクトを渡すことができる。
例:
// webpack.config.js
module.exports = function(options) {
  console.log(options);
  return {
    entry: './src/index.js',
    ...
# "scripts": { "webpack": "webpack" } は package.json に記載済み
$ npm run webpack -- --env foo
> webpack2-playground@1.0.0 webpack /Users/yamazaki/workspace/webpack2-playground
> webpack "--env" "foo"

foo

$ npm run webpack -- --env.foo 1 --env.bar 2

> webpack2-playground@1.0.0 webpack /Users/yamazaki/workspace/webpack2-playground
> webpack "--env.foo" "1" "--env.bar" "2"

{ foo: 1, bar: 2 }
webpack.config.js の書き方が一部変更
これは機能ではないが一応。
Migrating from v1 to v2 に従ってマイグレーションが必要。
おまけ:Tree Shaking について
最後におそらく webpack2 の目玉機能である Tree Shaking について。
すごいざっくりとした理解だけど、「export してるけどどこからも import されていないモジュールをバンドル時に自動的に削除して、ファイルサイズを小さくしてくれる」機能のよう。
Tree Shaking を利用するには Babel で import/export をトランスパイルしないように設定してあげる必要があり、具体的には .babelrc で
{
  "presets": ["es2015"]
}
としていたところを
{
  "presets": [["es2015", { "modules": false }]]
}
のように変更してあげる必要がある。
ただ、
webpack2のTree Shakingの恩恵を受けるにはBabel側でCommonJS形式に変換しないよう["es2015", {"modules": false}]とする必要があるが、これをやるとgulpfile.babel.jsが動かなくなる
— Shingo Yamazaki (@zaki___yama) 2017年2月4日
で詰んでる
という問題にぶち当たった。これは、es2015 の preset を webpack.config.js に寄せるしかないのか...
日本語の解説記事だと冒頭でもリンク貼ったけどこちらが参考になる。
また、英語だと
Webpack 2 Tree Shaking Configuration – Modus Create: Front End Development – Medium
はわかりやすいが若干情報が古く、ただ サンプルコード の方は情報がアップデートされてるので参考にできる。
あとは
Tree-shaking ES6 Modules in webpack 2
だろうか。
おわりに
参考にしたサイト自体の情報が古かったり間違ってたりする可能性はあるが、とりあえず↑に書いたことは自分でも動作確認できた(webpack のバージョンは 2.2.1)。
日頃からリポジトリをウォッチしてたり changelog 見てたら正しい情報をキャッチアップし続けられるんだろうけど、そういうことできる人はほんとすごいなと思う。
(私はこういうことが知りたいと思ったときにどこを見るようにすればいいのかもよくわかってません...)
gulpタスクに.envで定義した環境変数を渡すならgulp-envでなくnode-env-fileを使う
はじめに
タイトルの通り。
gulp タスクに .env のようなファイルで定義した環境変数を渡したくて、
gulp-env と node-env-file を比較した。
結論としては node-env-file の方が使い勝手が良かった。
それぞれの使い方
node-env-file
// gulpfile.js
var gulp = require('gulp');
var env = require('node-env-file');

env('.env');

gulp.task('default', function() {
  console.log(process.env.FOO);
});
こんな感じ。.env には
FOO=foo
としておくと gulp タスク側で process.env.FOO で参照できる。
gulp-env
// gulpfile.js
var gulp = require('gulp');
var env = require('gulp-env');

env({
  file: '.env.json',
  vars: {
    // any variables you want to overwrite
  }
});

gulp.task('default', function() {
  console.log(process.env.BAR);
});
こう。
vars はオプションで、指定しなくても良い。指定すると .env.json の変数の内容をさらに上書きできる。(使いみちがわからず)
.env.json はこのように JSON 形式で記述する。(json 以外のフォーマットも対応しているよう)
{
  "BAR": "bar"
}
node-env-file が gulp-env より優れていると感じた点
実行時に変数を上書きできる
node-env-file は gulp タスク実行時に
$ FOO=hoge gulp
とすることで、.env に定義した変数を上書きすることができる。
### node-env-file の場合
$ gulp
foo

$ FOO=hoge gulp
hoge

### gulp-env の場合
$ gulp
bar

# コマンド実行時に上書きできない
$ BAR=hoge gulp
bar
オプションで、.env ファイルが存在しなくてもエラーにならないようにすることができる
node-env-file には raise というオプションがあって、これを false にするとファイルが存在しなくてもエラーにしないことができる。
env('.env', { raise: false });
別解として
node-foreman をインストールするという手もある。
$ nf run gulp
[Vim]NeomakeでFlowを実行したときにexit code 64が表示されたときのメモ
Vim の Lint チェックに Neomake を使っていて、実行時に
Neomake: flow: completed with exit code 64.
と表示されてしまったときのメモ。
Flow のバージョンは 0.37.4。
原因と解決策
https://github.com/neomake/neomake/blob/master/doc/neomake.txt#L319-L327
によると g:neomake_verbose という変数があるので、.vimrc に
g:neomake_verbose=3
を追加して Neomake を再度実行する。
:messages
でメッセージを表示したところ、以下のようになっていた。
Neomake [0.850]: [#2] stderr: flow: ['flow: unknown option ''--old-output-format''.', 'Usage: flow [COMMAND] ', '', 'Valid values for COMMAND:', '  ast             Print the AST', '  autocomple
te    Queries autocompletion information', '  check           Does a full Flow check and prints the results', '  check-contents  Run typechecker on contents from stdin', '  coverage        Show
s coverage information for a given file', '  find-module     Resolves a module reference to a file', '  find-refs       Gets the reference locations of a variable or property', '  force-recheck
   Forces the server to recheck a given list of files', '  gen-flow-files  EXPERIMENTAL: Generate minimal .js.flow files for publishing to npm.', '  get-def         Gets the definition location
 of a variable or property', '  get-importers   Gets a list of all importers for one or more given modules', '  get-imports     Get names of all modules imported by one or more given modules',
'  init            Initializes a directory to be used as a flow root directory', '  ls              Lists files visible to Flow', '  port            Shows ported type annotations for given file
s', '  server          Runs a Flow server in the foreground', '  start           Starts a Flow server', '  status          (default) Shows current Flow errors by asking the Flow server', '  sto
p            Stops a Flow server', '  suggest         Shows type annotation suggestions for given files', '  type-at-pos     Shows the type at a given file and position', '  version         Pri
nt version information', '', 'Default values if unspecified:', '  COMMAND^Istatus', '', 'Status command options:', '  --color                           Display terminal output in color. never,
always, auto (default: auto)', '  --from                            Specify client (for use by editor plugins)', '  --help                            This list of options', '  --ignore-version
                 Ignore the version constraint in .flowconfig', '  --json                            Output results in JSON format', '  --no-auto-start                   If the server is not ru
nning, do not start it; just exit', '  --one-line                        Escapes newlines so that each error prints on one line', '  --pretty                          Pretty-print JSON output (
implies --json)', '  --quiet                           Suppress output about server startup', '  --retries                         Set the number of retries. (default: 3)', '  --retry-if-init
                 retry if the server is initializing (default: true)', '  --sharedmemory-dep-table-pow      The exponent for the size of the shared memory dependency table. The default is 17, i
mplying a size of 2^17 bytes', '  --sharedmemory-dirs               Directory in which to store shared memory heap (default: /dev/shm/)', '  --sharedmemory-hash-table-pow     The exponent for t
he size of the shared memory hash table. The default is 19, implying a size of 2^19 bytes', '  --sharedmemory-log-level          The logging level for shared memory statistics. 0=none, 1=some',
 '  --sharedmemory-minimum-available  Flow will only use a filesystem for shared memory if it has at least these many bytes available (default: 536870912 - which is 512MB)', '  --show-all-error
s                 Print all errors (the default is to truncate after 50 errors)', '  --strip-root                      Print paths without the root', '  --temp-dir                        Direct
ory in which to store temp files (default: /tmp/flow/)', '  --timeout                         Maximum time to wait, in seconds', '  --version                         (Deprecated, use `flow vers
ion` instead) Print version number and exit', '']
Neomake [0.854]: Channel has been closed: channel 2 closed
どうやら --old-output-format という古いオプションをつけて実行しており、そんなオプションないよと怒られているようだ。
参考(関係ある?):Remove --old-output-format · Issue #2844 · facebook/flow
で、今度は Neomake 側を調べてみたところこの PR でどうも修正したように見える。
Fix flow output by rafaelrinaldi · Pull Request #880 · neomake/neomake
そういえばしばらくプラグインのアップデートとかしてなかったなと思い、私は dein.vim を使っているので
:call dein#update()
でアップデートしてみたところ lint が通るようになった。
※ただ、それ以外にも色々 Neomake ではうまくいかないことがあったので現在は ALE を使うことにした。それはまた別途書くことにする。
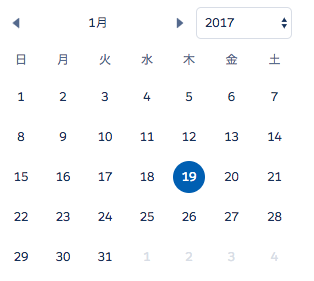
react-lightning-design-systemのDatepickerを日本語表記にする
メモ。
react-lightning-design-system の Datepicker の月や曜日の部分を日本語にしたい。

locale のようなプロパティはないが、内部的に Moment.js を使っているので以下のようにして変更できた。
(2017/01/20追記)
普通に
moment.locale('ja');
だけでいけました...moment のロケールを設定する方法が間違ってたみたい。
locale が ja のときの設定は
https://github.com/moment/moment/blob/develop/src/locale/ja.js
のようなので、デフォルトの表記で問題ない場合は updateLocale する必要はない。
(追記ここまで)
まず、月の表示は
https://github.com/mashmatrix/react-lightning-design-system/blob/master/src/scripts/Datepicker.js#L192
にあるように moment.monthsShort() を使っている。
そしてこのメソッドは通常 Jan, Sep, ... などの英語表記での文字列を返すのだが、それをカスタマイズするには以下のようにする。
moment.updateLocale('ja', {
  monthsShort: ['1月', '2月', '3月', '4月', '5月', '6月', '7月', '8月', '9月', '10月', '11月', '12月'],
});
参考:http://momentjs.com/docs/#/customization/
moment.updateLocale() でロケール設定を変更し、その際に第二引数でフォーマットを定義するオブジェクトを渡す。
同様に、週の表示は
https://github.com/mashmatrix/react-lightning-design-system/blob/master/src/scripts/Datepicker.js#L233
にあるように moment.weekdaysMin() を使っているようなので
monthsShort() のときと同じく updateLocale 時に設定すれば良い。
moment.updateLocale('ja', {
  monthsShort: ['1月', '2月', '3月', '4月', '5月', '6月', '7月', '8月', '9月', '10月', '11月', '12月'],
  weekdaysMin: ['日', '月', '火', '水', '木', '金', '土'],
});
この状態で Datepicker を開くと以下のようになる。
サンプルコード
import React, { PropTypes } from 'react';
import moment from 'moment';

import { Datepicker } from 'react-lightning-design-system';

class MyDatepicker extends React.Component {
  constructor(props) {
    super(props);
    this.state = {
      selectedDate: props.selectedDate || moment().format('YYYY-MM-DD'),
    };
  }

  onSelectDate(selectedDate) {
    this.setState({ selectedDate });
    this.props.onSelectDate(selectedDate);
  }

  render() {
    return (
      <div style={ { padding: '12px', width: '20rem' } }>
        <Datepicker
          selectedDate={ this.state.selectedDate }
          onSelect={ this.onSelectDate.bind(this) }
        />
      </div>
    );
  }
}

MyDatepicker.propTypes = {
  selectedDate: PropTypes.string,
  onSelectDate: PropTypes.func.isRequired,
};

export default class App extends React.Component {
  render() {
    moment.updateLocale('ja', {
      monthsShort: ['1月', '2月', '3月', '4月', '5月', '6月', '7月', '8月', '9月', '10月', '11月', '12月'],
      weekdaysMin: ['日', '月', '火', '水', '木', '金', '土'],
    });
    return <MyDatepicker />
  }
}
SlackのOutgoing WebhookとGoogle Apps ScriptでBotを作ったときにつまずいたところメモ
Slack の Bot にメンションしたら Outgoing Webhook で GAS のスクリプトを実行するようなものが作りたくて
とりあえず連携するところまで作ったんだけど、思ったよりハマったところがあったのでメモ。
基本的な作り方に関しては、こちらの記事の通りに作成するとうまくいく。
初心者がGASでSlack Botをつくってみた - CAMPHOR- Tech Blog
主な流れ
- GAS で
doPost()メソッドを定義したスクリプトを作り、「公開 > ウェブ アプリケーションとして導入...」で URL を取得する - https://api.slack.com/web から Slack の API token を取得し、GAS のスクリプトでその token を使用する
- Slack の Outgoing Webhooks を作成し、「URL(s)」に GAS の URL を貼り付ける
- 「Trigger Words(s)」にスクリプト実行のキーワードとなる文字列を入れる(
,区切りで複数指定可能)
bot のアイコンが表示されない
chat.postMessage で username に Bot 名を正確に入力しているにも関わらず、Bot のアイコンに指定した画像が表示されなかった。
icon_url または icon_emoji で指定してあげる必要があったんですね。初歩的。
GAS のスクリプトが更新されない
「ウェブ アプリケーションとして導入」した後にスクリプトを変更した際、バージョンを上げずに単に「更新」してた。

ここですね。
少しでもスクリプトを更新したら、毎回プロジェクト バージョンで「新規作成」を選びバージョンを1つ上げる必要があった。
これどうにかならないかなと思ったんだけど今のところわからず。
「最新のコードをテスト」で doGet() についてはテストできるんだけど、その URL に POST しても doPost() は見つからないと言われた。
あと、アプリケーションにアクセスできるユーザーを「全員(匿名ユーザーを含む)」にするのも必要。
bot へメンションしてるのに Webhook が反応しない
これが一番ハマったところ。
せっかく Bot アカウントも作っているので、@my-bot のようにメンションでスクリプト実行したかったが何回やっても反応しなかった。
調べてみたところ、メンションしているときは Bot 名でなく Bot の UserId で指定する必要があることがわかった。
参考:SlackのOutgoing Webhookで@つきのmentionを捕まえる - beatsync.net
また、Bot の User Id は画面からはわからなかったので、確認するにはこちらの記事を参考に Slack API を叩いて確認した。
参考:slackに参加しているメンバーのUser IDを調べる方法 - /var/www/yatta47.log
$ curl "https://slack.com/api/users.list?token=[TOKEN]"
https://api.slack.com/web で取得した token を使って上記のように API を叩き、レスポンスを Online JSON Viewer などで整形して目的の Bot の User Id を探す。
おまけ:GAS スクリプト側を動作確認するには
$ curl -X POST -v -F 'hoge=fuga' https://script.google.com/macros/s/***/exec
とかした。
[Apex]レコードが承認プロセスでロック中かどうか判定する
メモ。
レコードの ID を元に、そのレコードが現在承認プロセスの最中で、かつロックされているかどうか Apex で判定したい。
ここを参考にできた。
apex - Check if a record is in approval process - Salesforce Stack Exchange
Approval.isLocked(id)
を使う。
参考:Approval クラス | Apex 開発者ガイド | Salesforce Developers
isLocked は id だけでなく id のリストだったり SObject またはそのリストも引数として受け取れるらしい。
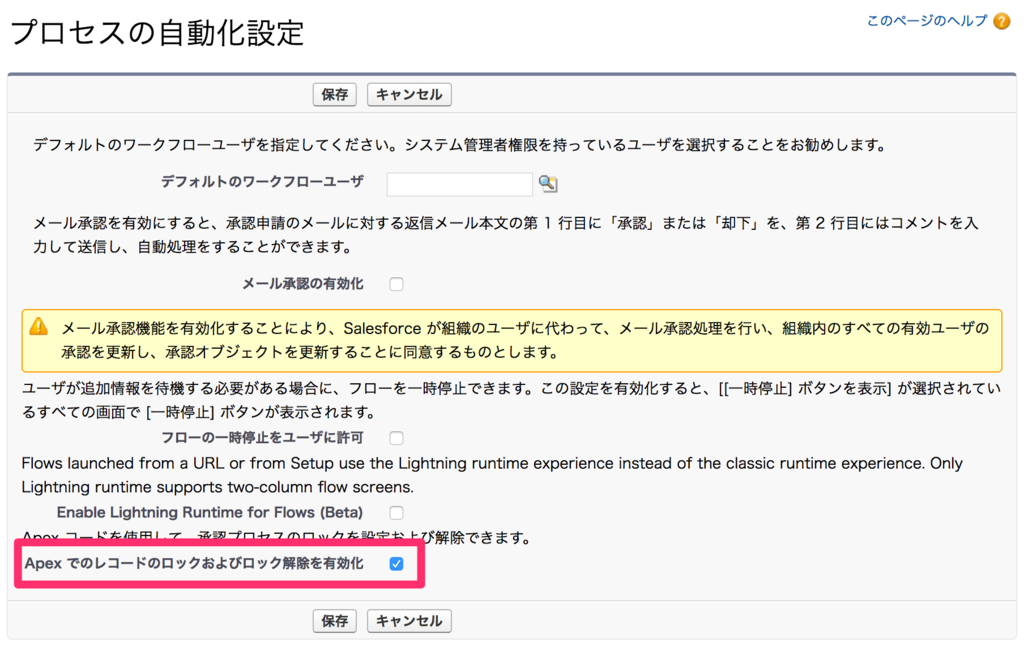
1個だけ注意点として、このメソッドは
作成 > ワークフローと承認プロセス > プロセスの自動化設定
より、「Apex でのレコードのロックおよびロック解除を有効化」に✔を入れておかないといけない。
参考:SFDC:Apexトリガによる承認申請時のレコードロック解除について - tyoshikawa1106のブログ
設定しておかないと、以下のエラーが出る。
System.NoAccessException: Apex approval lock/unlock api preference not enabled.