VagrantとAnsibleでMacにWindows10仮想環境を構築する
Windows「に」Vagrant を入れて仮想環境を作成したという記事は Web 上にたくさん見つかるけど
Vagrant で Windows 環境「を」構築したという記事はあんまり見つからなかったので、メモ。
また、Vagrant や Ansible というインフラ系ツールについてよく耳にするものの実際触ったことがなくて
それぞれでできること等ちゃんと理解していなかったので、勉強も兼ねて。
動作環境
今回使用した各ツールのバージョンは以下の通り。
- Mac OS X Yosemite 10.10.5
- Vagrant 1.8.1
- Ansible 2.0.0.2
- Python 2.7.10
- Virtualbox 5.0.10
- pywinrm 0.1.1
はじめに
Mac で Web アプリケーション開発をしていると、IE での動作確認のために Windows 環境を使いたいことがよくある。
今は Virtualbox と Modern.ie という組み合わせによって無料で Windows 環境を構築できるが、
以下のようなセットアップを行う必要があり、1回きりとはいえなかなか手間のかかる作業だなーと感じていた。
- Virtualbox の各種設定をする
- メモリの割り当て
- クリップボードを共有
- 共有フォルダを設定
- ロケールやキーボード設定を日本語にする
- Virtualbox Guest Additions をインストールする
- エディタや Git、Tortoise SVN などの各種アプリケーションをインストールする
自分一人ならいいが、開発チームの Mac 所有者全員にこういった初期設定を行ってもらおうとすると作業手順の共有が大変。
そこで、今まで便利そうだなーと思いつつ具体的に何ができるのかわかってなかった Vagrant と Ansible を使って
このようなセットアップ作業を自動化した Windows 環境の構築に挑戦してみた。
Vagrant と Ansible
ここで、Vagrant と Ansible がそれぞれどのようなツールなのか確認する。
参考:最近のインフラ系ツールが多すぎて何が何だかわからない!からの卒業 - Qiita
(レイヤーが異なる、という説明はなるほどと思った)
Vagrant

- 仮想環境の作成や環境設定を行う ことができるツール
- 仮想環境を box という形式のファイルにパッケージングして管理する
- 構築した環境の配布や共有が簡単
- 仮想環境の実行には Virtualbox を使うので、両方インストールが必要
- おおむね Virtualbox の設定画面からできることを、
Vagrantfileというファイルで設定可能。
たとえば- 仮想環境に対するメモリやディスク領域の割り当て
- ゲスト - ホスト間のネットワーク設定
- ホスト OS との共有フォルダの設定
- 仮想環境内で行う作業(アプリのインストールとか)とかはできない、、、と思ってたんだけどそうでもないらしい
- 後述する Ansible を使わなくても、任意のシェルスクリプトを実行することができる
- 参考:Shell Scripts - Provisioning | Vagrant by HashiCorp
- 仮想環境内で色々な設定を行った後に、それを box ファイルとしてパッケージングする、ということもできる のも便利だと思う
- box ファイルはけっこうなサイズになる(*)ので、git で管理するものではない
- (*) Windows のみ確認
Ansible

- 「構成管理ツール」とか「プロビジョニングツール」と呼ばれる
- (注:「プロビジョニングツール」という言葉には Vagrant のようなレイヤーも含むのかも)
- 似たようなものとして、他に Chef や Puppet などがある。使ったことない
- 設定ファイルを元にサーバーの各種設定を自動実行する ツール
- たとえば Mac であれば、
「Homebrew 入れてbrew install xxxでさまざまなツールを入れて...」
を設定ファイルに宣言的に記述しておいて、コマンド一発で自動実行できる
- たとえば Mac であれば、
- 設定ファイルとして登場するのは主に2つ(必ず両方必要というわけではない)
- プロビジョニング対象のサーバーの情報(URL など)を持った inventory file
- サーバーの設定内容を記述した playbook と呼ばれる YAML 形式のファイル
- 構成管理ツールなので、仮想環境に限らずローカルPCの環境構築にも使える。これで自分の Mac のセットアップを管理するという記事も見かける
- Ansible 1.7 から Windows にも対応したらしい
Vagrant と Ansible の連携
上に書いたように、Vagrant は仮想環境を構築するためのツール、Ansible は(仮想かどうかに関係なく)特定の環境のセットアップを自動化するためのツールなので両者は独立しているが、Vagrant 1.7 以降は Vagrant の設定から Ansible を実行できるらしい。
Using Vagrant and Ansible — Ansible Documentation
Vagrantfile 内に以下のように記述する。
config.vm.provision "ansible" do |ansible|
  ansible.playbook = "playbook.yml"
end
インストール
Vagrant および Ansible をインストールする。
Mac の場合 Homebrew(と Homebrew-Cask)でインストールできる。
Vagrant には Virtualbox が、Ansible には Python が必要なので一緒にインストールする。
また、Ansible で Windows をプロビジョニングする場合は別途 pywinrm という Python のパッケージが必要になる。
※ Ansible は Homebrew でもインストールできるが、2016/03/07現在の最新バージョン2.0.1.0だとうまく動かなかった(後述)ので 2.0.0.2 をインストールする。
Homebrew ではバージョン指定できないので pip でインストールする。
# Vagrant
$ brew tap caskroom/cask
$ brew cask install virtualbox
$ brew cask install vagrant

# Ansible
$ brew install python
$ pip install ansible==2.0.0.2
$ pip install winrm
Windows10 の box ファイルをダウンロード
Windows10 の box ファイルは Microsoft のサイト からもダウンロードすることが可能だが、
ここからダウンロードしたファイルだとなぜかネットワークの設定がうまくいかなかったので
ここでは Vagrant の下記サイトからダウンロードする。
https://app.vagrantup.com/boxes/search?utf8=%E2%9C%93&sort=&provider=virtualbox&q=windows
(※2021/03/24 リンク先がNot Foundになってたので修正)
こちらは Vagrant のコミュニティ?によって作られた box ファイルをダウンロードすることができるサイトになっているようだ。
(http://www.vagrantbox.es/ には Windows8.1 までしかなかった)

見つけた box 名を直接指定して vagrant box add すればダウンロードが開始される。
$ vagrant box add modernIE/w10-edge
==> box: Loading metadata for box 'modernIE/w10-edge'
    box: URL: https://atlas.hashicorp.com/modernIE/w10-edge
==> box: Adding box 'modernIE/w10-edge' (v0.0.3) for provider: virtualbox
    box: Downloading: https://atlas.hashicorp.com/modernIE/boxes/w10-edge/versions/0.0.3/providers/virtualbox.box
    box: Progress: 19% (Rate: 5346k/s, Estimated time remaining: 0:15:49)

# ダウンロード完了後
$ vagrant box list
modernIE/w10-edge (virtualbox, 0.0.3)
Vagrant のセットアップ
ここから Vagrantfile を作成していく。
まず、vagrant init コマンドを使うと Vagrantfile の雛形が自動生成される。
$ mkdir vagrant-win10
$ cd vagrant-win10
$ vagrant init
$ ls
Vagrantfile
Vagrantfile の冒頭は以下のようになっているはずなので、config.vm.box という変数を
先ほど追加した box 名に置き換える。
Vagrantfile
# -*- mode: ruby -*-
# vi: set ft=ruby :

# All Vagrant configuration is done below. The "2" in Vagrant.configure
# configures the configuration version (we support older styles for
# backwards compatibility). Please don't change it unless you know what
# you're doing.
Vagrant.configure(2) do |config|
  # The most common configuration options are documented and commented below.
  # For a complete reference, please see the online documentation at
  # https://docs.vagrantup.com.

  # Every Vagrant development environment requires a box. You can search for
  # boxes at https://atlas.hashicorp.com/search.
  config.vm.box = "modernIE/w10-edge"  # ここ
続いて、順番に Vagrantfile の設定を行っていく。
Windows 用の設定
今回ゲスト OS は Windows なので、以下を config.vm.box のすぐ下に記述する。
Vagrant.configure(2) do |config|
  ...(略)...
  config.vm.guest = :windows
  config.vm.communicator = :winrm
  ...
config.vm.communicator はゲストOSとの接続方法を指定するもので、ゲストが Linux OS であればデフォルトの ssh で接続できるが
Windows の場合は ssh ではだめなので、winrm とする。
参考:config.vm - Vagrantfile - Vagrant by HashiCorp
Virtualbox 用の設定
Virtualbox 用の設定は
  # Provider-specific configuration so you can fine-tune various
  # backing providers for Vagrant. These expose provider-specific options.
  # Example for VirtualBox:
  #
  # config.vm.provider "virtualbox" do |vb|
  #   # Display the VirtualBox GUI when booting the machine
  #   vb.gui = true
  #
  #   # Customize the amount of memory on the VM:
  #   vb.memory = "1024"
  # end
というブロックで行う。
ここでは以下のように設定する。
  # Provider-specific configuration so you can fine-tune various
  # backing providers for Vagrant. These expose provider-specific options.
  # Example for VirtualBox:
  #
  config.vm.provider "virtualbox" do |vb|
    # 起動時に自動的に GUI を表示する場合はコメントを外す
    # (起動が遅くなる気がする)
    # vb.gui = true

    # Virtualbox に表示される名前(なんでも良い)
    vb.name = "vagrant-win10"

    # メモリ
    vb.memory = "1024"
    # クリップボードの共有: 双方向
    vb.customize ["modifyvm", :id, "--clipboard", "bidirectional"]
    # ビデオメモリー(MB)
    vb.customize ["modifyvm", :id, "--vram"  , "128"]
  end
これ以外に設定できる項目については以下を参考にする。
Configuration - VirtualBox Provider | Vagrant by HashiCorp
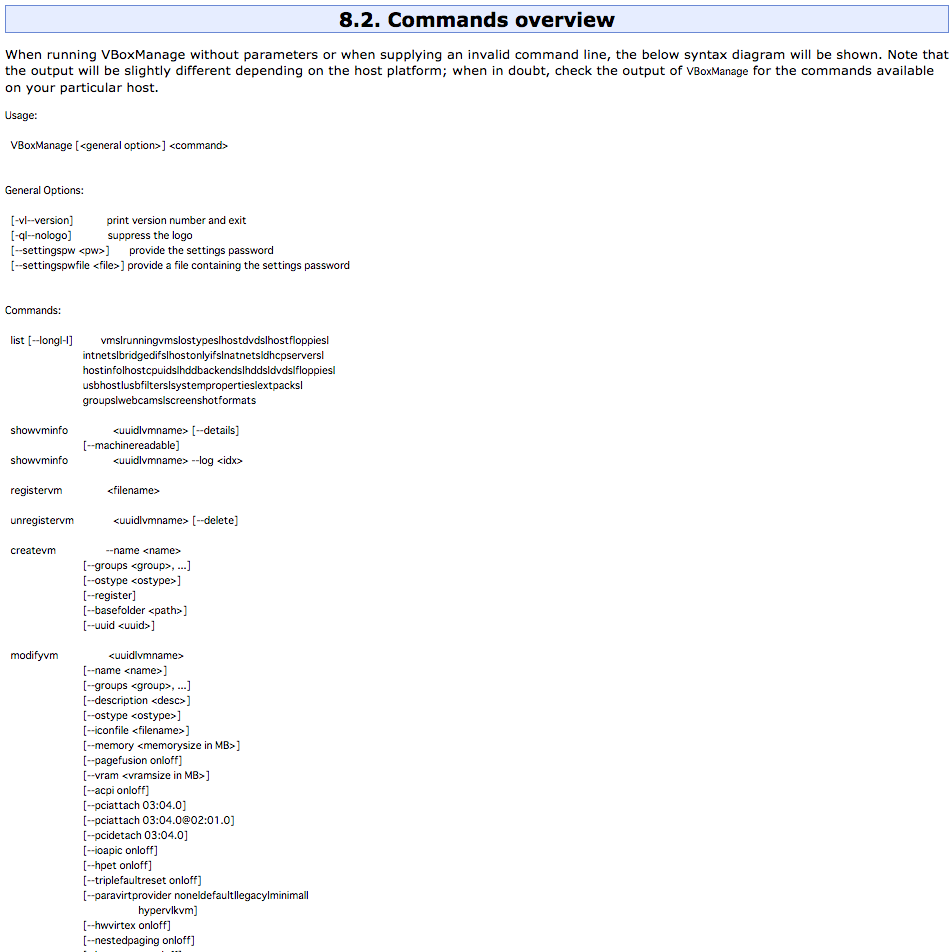
このページによると gui, memory, cpus, name と linked_clone というオプション以外は
vb.customize ["modifyvm", ...]
という書き方で設定していくようなんだけど、それは VBoxManage という以下のページに書かれている。
Chapter 8. VBoxManage
とんでもなくたくさんのオプションが用意されてるらしく、まだ全然把握できていない。
ネットワーク設定
NAT のポートフォワーディング設定と、プライベートネットワークの設定を行う。
config.vm.box の下にコメントアウトされている箇所があると思うので、これだけ記述する。
  # ↓ コメントは雛形にあったもの
  # Create a private network, which allows host-only access to the machine
  # using a specific IP.
  config.vm.network "private_network", ip: "192.168.33.10"
ポートフォワーディングについては
  config.vm.network "forwarded_port", guest: 3389, host: 3389
  config.vm.network "forwarded_port", guest: 5985, host: 55985, id: "winrm", auto_correct: true
などが記載されている記事もいくつか見つけたが、特に宣言しなくても自動的に以下のように設定されているようだった。

各ネットワークの違いについては以下が参考になった。
Vagrantのネットワーク周りのあれこれ - Septeni Engineer's Blog
Ansible 用の設定
続いて、Ansible 側の設定。
inventory file
ファイル名は何でもいい。ここでは hosts とし、Vagrantfile と同じ場所に置く。
hosts
[windows]
192.168.33.10

[windows:vars]
ansible_user=IEUser
ansible_password=Passw0rd!
# ansible_port=5986
ansible_connection=winrm
# The following is necessary for Python 2.7.9+ when using default WinRM self-signed certificates:
ansible_winrm_server_cert_validation=ignore
playbook
続いて、一番重要となる playbook を記述する。
playbook は基本的に
- hosts: windows
  tasks:
  - name: task A
    # タスクの内容
  - name: task B
    # タスクの内容
    ...
というように、hosts で対象を指定しつつ tasks に実行したいタスクをひたすら書き並べればいい、というぐらいに理解している。
そして今回記述するタスクに関しては、Windows 用のモジュール一覧がここにある。
http://docs.ansible.com/ansible/list_of_windows_modules.html
ここでは、win_chocolatey というモジュールを使ってアプリのインストールを行うことを試みる。
win_chocolatey は Chocolatey という Windows 版パッケージ管理ツールを使うためのモジュール。
Vagrantfile、hosts と同じところに playbook.yml というファイルを作り、以下を記述する。
playbook.yml
- hosts: windows
  tasks:
  - name: Install git
    win_chocolatey:
      name: git
  - name: Install tortoisesvn
    win_chocolatey:
      name: tortoisesvn
  - name: Install Notepad++
    win_chocolatey:
      name: notepadplusplus
  - script: setup.ps1
インストールするアプリケーションとして適当に Git、TortoiseSVN、Notepad++ を選んだ。
Vagrantfile の設定
Vagrantfile の
  # Enable provisioning with a shell script. Additional provisioners such as
  # Puppet, Chef, Ansible, Salt, and Docker are also available. Please see the
  # documentation for more information about their specific syntax and use.
  # config.vm.provision "shell", inline: <<-SHELL
  #   sudo apt-get update
  #   sudo apt-get install -y apache2
  # SHELL
と書かれていたところに、Ansible 用の設定を記述する。
ここでは以下のようにする。
  config.vm.provision "ansible" do |ansible|
    ansible.inventory_path = "hosts"  # inventory file へのパス
    ansible.playbook = "playbook.yml"  # playbook へのパス
    ansible.limit = "windows"
    ansible.verbose = "vv"  # コンソールに出力するログのレベルを調整。好みで
  end
limit は inventory file の [windows] と名前を一致させる。指定しないといけないものなんだーという程度の認識しかない。
書かないと以下のエラーになる。
ERROR! Specified --limit does not match any hosts
Ansible failed to complete successfully. Any error output should be
visible above. Please fix these errors and try again.
VM の起動
VM の起動は vagrant up というコマンドを使う。
起動時にプロビジョニングも実行される。
$ vagrant up
Bringing machine 'default' up with 'virtualbox' provider...
==> default: Importing base box 'modernIE/w10-edge'...
==> default: Matching MAC address for NAT networking...
==> default: Checking if box 'modernIE/w10-edge' is up to date...
==> default: Setting the name of the VM: vagrant-win10
==> default: Clearing any previously set network interfaces...
==> default: Preparing network interfaces based on configuration...
    default: Adapter 1: nat
    default: Adapter 2: hostonly
==> default: Forwarding ports...
    default: 3389 (guest) => 3389 (host) (adapter 1)
    default: 5985 (guest) => 55985 (host) (adapter 1)
    default: 5986 (guest) => 55986 (host) (adapter 1)
==> default: Running 'pre-boot' VM customizations...
==> default: Booting VM...
==> default: Waiting for machine to boot. This may take a few minutes...
    default: WinRM address: 127.0.0.1:55985
    default: WinRM username: IEUser
    default: WinRM execution_time_limit: PT2H
    default: WinRM transport: plaintext
==> default: Machine booted and ready!
==> default: Checking for guest additions in VM...
==> default: Configuring and enabling network interfaces...
==> default: Mounting shared folders...
    default: /vagrant => /Users/yamazaki/workspace/vagrant/win10-vm-with-vagrant-ansible
    ...
プロビジョニングの実行(と、ちょっと修正)
VM を起動した状態でのプロビジョニングの実行は vagrant provision というコマンドを実行する。
ただ、ここまでの設定で実行すると以下のようにタイムアウトエラーになってしまいうまくいかない。
$ vagrant provision
==> default: Running provisioner: ansible...
    default: Running ansible-playbook...
PYTHONUNBUFFERED=1 ANSIBLE_FORCE_COLOR=true ANSIBLE_HOST_KEY_CHECKING=false ANSIBLE_SSH_ARGS='-o UserKnownHostsFile=/dev/null -o IdentitiesOnly=yes -i '/Users/yamazaki/.vagrant.d/insecure_private_key' -o ControlMaster=auto -o ControlPersist=60s' ansible-playbook --connection=ssh --timeout=30 --extra-vars=ansible_ssh_user='vagrant' --limit='windows' --inventory-file=hosts -vvvv playbook.yml
No config file found; using defaults
Loaded callback default of type stdout, v2.0
1 plays in playbook.yml

PLAY ***************************************************************************

TASK [setup] *******************************************************************
<192.168.33.10> ESTABLISH WINRM CONNECTION FOR USER: IEUser on PORT 5986 TO 192.168.33.10
fatal: [192.168.33.10]: FAILED! => {"failed": true, "msg": "ERROR! the connection attempt timed out"}

NO MORE HOSTS LEFT *************************************************************

PLAY RECAP *********************************************************************
192.168.33.10              : ok=0    changed=0    unreachable=0    failed=1

Ansible failed to complete successfully. Any error output should be
visible above. Please fix these errors and try again.
どうやら調べてみると、Powershell 3.0 以降を使う場合は特定のスクリプトを実行しないといけないらしい。
http://docs.ansible.com/ansible/intro_windows.html#windows-system-prep
To automate setup of WinRM, you can run this PowerShell script on the remote machine.
実際、リンク先のスクリプトを Windows 側で実行してからだとうまくいく。
が、そのためにわざわざホスト側で作業しないといけないのはつらい。
というわけで、ダメ元で Ansible の処理の前に Shell Provisioner を使って上記スクリプトを実行させてみる。
まず、リンク先のスクリプトをダウンロードし、Vagrantfile などと同じ場所に保存する。
ファイル名は ConfigureRemotingForAnsible.ps1 とした。
次に、Vagrantfile の Ansible のブロックの前に以下を記述する。
  config.vm.provision "shell" do |shell|
    shell.path = "ConfigureRemotingForAnsible.ps1"
  end
これが Vagrant の Shell Provisioner と呼ばれるもので、ホスト OS 側に用意した任意のスクリプトをゲスト OS 内で実行することができる。
Windows の場合は PowerShell スクリプトとなる。
この状態で再度プロビジョニングを行ってみる。
$ vagrant provision
==> default: Running provisioner: shell...
    default: Running: ConfigureRemotingForAnsible.ps1 as c:\tmp\vagrant-shell.ps1
==> default: Self-signed SSL certificate generated; thumbprint: 6C7A2C95A618F98C0C72E358BE559267283AC3AA
==> default:
==> default: wxf                 : http://schemas.xmlsoap.org/ws/2004/09/transfer
==> default: a                   : http://schemas.xmlsoap.org/ws/2004/08/addressing
==> default: w                   : http://schemas.dmtf.org/wbem/wsman/1/wsman.xsd
==> default: lang                : en-US
==> default: Address             : http://schemas.xmlsoap.org/ws/2004/08/addressing/role/anonymous
==> default: ReferenceParameters : ReferenceParameters
==> default: Ok.
==> default: Running provisioner: ansible...
    default: Running ansible-playbook...
PYTHONUNBUFFERED=1 ANSIBLE_FORCE_COLOR=true ANSIBLE_HOST_KEY_CHECKING=false ANSIBLE_SSH_ARGS='-o UserKnownHostsFile=/dev/null -o IdentitiesOnly=yes -i '/Users/yamazaki/.vagrant.d/insecure_private_key' -o ControlMaster=auto -o ControlPersist=60s' ansible-playbook --connection=ssh --timeout=30 --extra-vars=ansible_ssh_user='vagrant' --limit='windows' --inventory-file=hosts -vv playbook.yml
No config file found; using defaults
1 plays in playbook.yml

PLAY ***************************************************************************

TASK [setup] *******************************************************************
ok: [192.168.33.10] => {"ansible_facts": {"ansible_architecture": "64-bit", "ansible_date_time": {"date": "3/10/2016", "day": "10", "hour": "06", "iso8601": "2016-03-10T06:50:29", "minute": "50", "month": "03", "year": "2016"}, "ansible_distribution": "Microsoft Windows NT 10.0.10240.0", "ansible_distribution_version": "10.0.10240.0", "ansible_fqdn": "IE11Win10", "ansible_hostname": "IE11WIN10", "ansible_interfaces": [{"default_gateway": "10.0.2.2", "dns_domain": null, "interface_index": 6, "interface_name": "Intel(R) PRO/1000 MT Desktop Adapter"}, {"default_gateway": null, "dns_domain": null, "interface_index": 10, "interface_name": "Intel(R) PRO/1000 MT Desktop Adapter #2"}], "ansible_ip_addresses": ["10.0.2.15", "fe80::e572:66b5:f4b3:2c99", "192.168.33.10", "fe80::517:9605:6a48:5c33"], "ansible_lastboot": "2016-03-10 06:48:03Z", "ansible_os_family": "Windows", "ansible_os_name": "Microsoft Windows 10 Enterprise Evaluation", "ansible_powershell_version": 5, "ansible_system": "Win32NT", "ansible_totalmem": 1073270784, "ansible_uptime_seconds": 146, "ansible_winrm_certificate_expires": "2017-03-10 07:00:18"}, "changed": false}

TASK [Install git] *************************************************************
changed: [192.168.33.10] => {"changed": true}

TASK [Install tortoisesvn] *****************************************************
changed: [192.168.33.10] => {"changed": true}

TASK [Install Notepad++] *******************************************************
changed: [192.168.33.10] => {"changed": true}

PLAY RECAP *********************************************************************
192.168.33.10              : ok=4    changed=3    unreachable=0    failed=0
無事最後までいった。
Virtualbox から GUI を起動して確認すると、ちゃんと Git とかがインストールされている。

ちなみに:Ansible 2.0.1.0 だと
vagrant provision したときに 401 エラーになった。
==> default: Running provisioner: ansible...
    default: Running ansible-playbook...
PYTHONUNBUFFERED=1 ANSIBLE_FORCE_COLOR=true ANSIBLE_HOST_KEY_CHECKING=false ANSIBLE_SSH_ARGS='-o UserKnownHostsFile=/dev/null -o IdentitiesOnly=yes -i '/Users/yamazaki/.vagrant.d/insecure_private_key' -o ControlMaster=auto -o ControlPersist=60s' ansible-playbook --connection=ssh --timeout=30 --extra-vars=ansible_ssh_user='vagrant' --limit='windows' --inventory-file=hosts -vv playbook.yml
No config file found; using defaults
1 plays in playbook.yml

PLAY ***************************************************************************

TASK [setup] *******************************************************************
fatal: [192.168.33.10]: FAILED! => {"failed": true, "msg": "ssl: 401 Unauthorized."}

NO MORE HOSTS LEFT *************************************************************
        to retry, use: --limit @playbook.retry

PLAY RECAP *********************************************************************
192.168.33.10              : ok=0    changed=0    unreachable=0    failed=1

Ansible failed to complete successfully. Any error output should be
visible above. Please fix these errors and try again.
成果物
ここまでの内容を GitHub に上げておく。
README.md に書いてある通りにインストールすれば動くはず。
仮想環境を box 化し、配布可能にする
仮想環境のパッケージ化は vagrant package コマンドを使う。
$ vagrant package
==> default: Attempting graceful shutdown of VM...
==> default: Clearing any previously set forwarded ports...
==> default: Exporting VM...
==> default: Compressing package to: /Users/yamazaki/workspace/vagrant/win10-vm-with-vagrant-ansible/package.box
これで package.box というファイルができあがる。
パッケージ化はかなり時間がかかる。またファイルサイズは 7GBぐらいだった。
あとはこの box ファイルを配布し、受け取った側は Virtualbox と Vagrant だけインストールして
$ vagrant box add [boxファイルへのパス] --name [VM名]
コマンドで仮想環境を構築することができる。
TODO
とりあえず今回は基本的なセットアップを試しただけなので、もうちょっと色々な設定ができるようにパラメータを見てみたい。
- 日本語化も自動化できないのか
- モジュールなさそうなので PowerShell スクリプトで実行する?
- Vagrantfile の Virtualbox の設定
- Ansible の Windows モジュール
それから、Vagrant に関しては大体わかったけど Ansible はもう少し勉強したい。
最近こういった書籍が発売されたので読んでみようかな。Docker もあるし。
![サーバ/インフラエンジニア養成読本 DevOps編 [Infrastructure as Code を実践するノウハウが満載!]](https://m.media-amazon.com/images/I/61mqLCfF3eL._SL500_.jpg "サーバ/インフラエンジニア養成読本 DevOps編 [Infrastructure as Code を実践するノウハウが満載!]")