vim で様々なプログラミング言語の文法チェック(syntax check) を
自動で行ってくれるプラグイン「Syntastic」ですが
そのまま python ファイルに適用すると不要な警告まで色々出てしまい少々うっとうしいです。
ので、Syntastic と、今回は syntax checker として pylint を採用したので
両者の設定方法を調べてみました。
Syntastic のインストール
NeoBundle を使えば、簡単にインストールできます。
.vimrc
NeoBundle 'scrooloose/syntastic'
また、以下は Syntastic の README に書いてあったオススメ設定だそうですが
ここではコメントアウトしときます (.vimrc に記述)
""" Recommended settings
""" see https://github.com/scrooloose/syntastic#settings
" set statusline+=%#warningmsg#
" set statusline+=%{SyntasticStatuslineFlag()}
" set statusline+=%*

" let g:syntastic_always_populate_loc_list = 1
" let g:syntastic_enable_signs = 1
" let g:syntastic_auto_loc_list = 1
" let g:syntastic_check_on_open = 1
" let g:syntastic_check_on_wq = 0
vim を開き、:NeoBundleInstall すればOK。
Syntastic 側の設定
Syntastic がインストールされた状態でpythonファイルを開くと、
保存した時に自動的にsyntax checkが行われるようになります。
ここで、pythonのsyntax checkerとしては pylint や flake8 などいくつかあるそうなんですが
ここでは pylint を使うよう設定します。
(pylint は pip install pylint などでインストール済みとします)
現在のsyntax checkerを確認する
まず、現在のsyntax checkerを調べるには :SyntasticInfo というコマンドを使います。
:SyntasticInfo

Syntastic version: 3.5.0-72
Info for filetype: python
Global mode: active
Filetype python is active
The current file will be checked automatically
Available checkers: pep8 pylint python
Currently enabled checkers: python pylint
自分の PC ではこんな感じで出力されました。
syntax checker として使用するツールを指定する
特定の filetype で使用する syntax checker を指定するには、
.vimrc に以下のように記述します。
let g:syntastic_<filetype>_checkers = ['<checker-name>']
今回の場合、python の syntax checker として pylint を使いたいので
let g:syntastic_python_checkers = ['pylint']
とします。
再度 vim を開き、:SyntasticInfo を実行すると、今度は
Syntastic version: 3.5.0-72
Info for filetype: python
Global mode: active
Filetype python is active
The current file will be checked automatically
Available checkers: pep8 pylint python
Currently enabled checker: pylint
最後の行だけ変わってます。
Syntastic を試してみる
さて、この状態で簡単なpythonクラスを書いてみます。
# -*- coding: utf-8 -*-


class Foo(object):

    def print_arg(self, arg):
        print arg
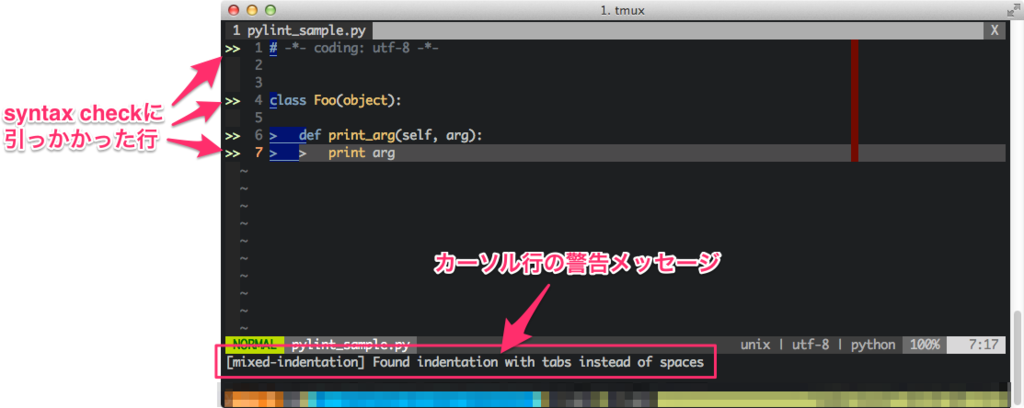
この状態で保存すると...見た目こんな感じになります。

こんな感じで、pylint に引っかかってしまった箇所と理由が一目でわかってイイ!のですが
ちょっと警告が出すぎな感が。。。
キャプチャでは7行目にカーソルがあるのですが、
Found indentation with tabs instead of spaces
つまり、インデントにスペースじゃなくてタブ使ってるよ!というものです。
普段、インデントはタブを使ってるのでこの警告に関しては無視してほしい。。。
ということで、今度は pylint 側の設定を行います。
pylint 側の設定を行う
.pylintrc ファイルを生成する
pylint の設定には .pylintrc という設定ファイルを使います。
以下のコマンドで、サンプルの .pylintrc ファイルをホームディレクトリ直下に生成してくれます。
$ pylint --generate-rcfile > ~/.pylintrc
生成された .pylintrc を開くと、以下のようになっています。
[MASTER]

# Specify a configuration file.
#rcfile=

# Python code to execute, usually for sys.path manipulation such as
# pygtk.require().
#init-hook=

...(略)

[MESSAGES CONTROL]

# Only show warnings with the listed confidence levels. Leave empty to show
# all. Valid levels: HIGH, INFERENCE, INFERENCE_FAILURE, UNDEFINED
confidence=

# Enable the message, report, category or checker with the given id(s). You can
# either give multiple identifier separated by comma (,) or put this option
# multiple time. See also the "--disable" option for examples.
#enable=

# Disable the message, report, category or checker with the given id(s). You
# can either give multiple identifiers separated by comma (,) or put this
# option multiple times (only on the command line, not in the configuration
# file where it should appear only once).You can also use "--disable=all" to
# disable everything first and then reenable specific checks. For example, if
# you want to run only the similarities checker, you can use "--disable=all
# --enable=similarities". If you want to run only the classes checker, but have
# no Warning level messages displayed, use"--disable=all --enable=classes
# --disable=W"
disable=W0312

...(略)
この disable= の部分に、無視したい pylint のメッセージコードを記述するわけです。
pylint のメッセージコードを確認する
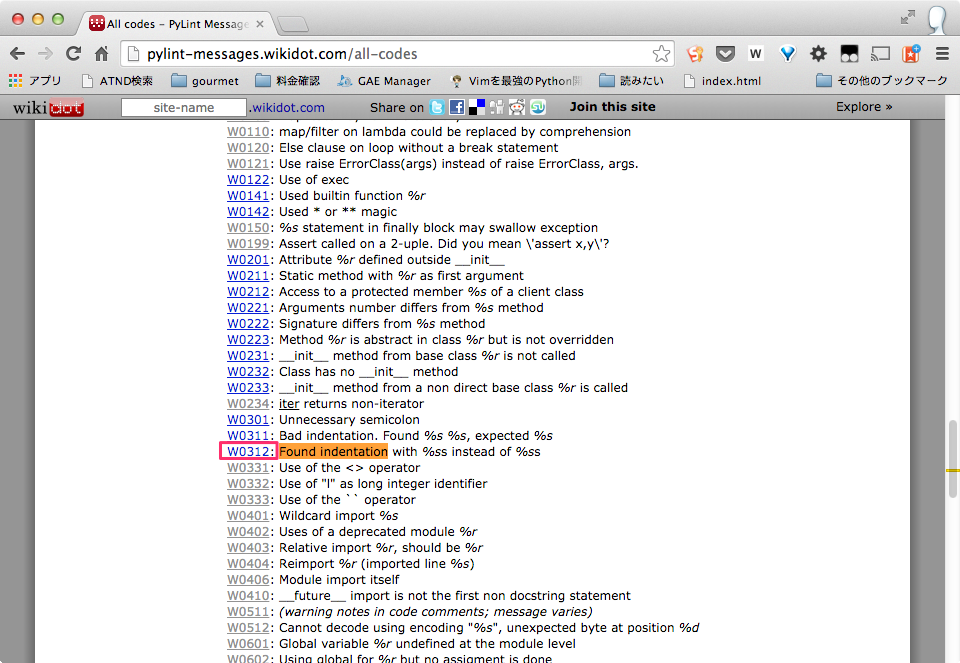
以下のサイトにメッセージの一覧が掲載されています。
http://pylint-messages.wikidot.com/all-codes
例えば、先ほどの Found indentation ... を検索すると

というわけで、W0312 を追加しておけばいいことがわかります。
こんな感じで、警告が出たらメッセージを確認し、
今後警告の必要がなければメッセージコードを調べて .pylintrc に書く...とすれば良さそうです。
おわりに (TODO)
というわけで、何とか自分の手で Syntastic の警告をカスタマイズすることはできたんですが
- メッセージコード1個1個追加してくのめんどい
- pylint 細かすぎ?
という懸念はあるので、他のsyntax checkerにするなり .pylintrc の書き方もう少し調べるなりといった課題は残りました。
また、冒頭に紹介した Syntastic の設定変数についても調べてみないとな。。。